


At artist alleys, people stopped by to look at my birb patches (lots of laughs and smiles from it haha!), and I also got to hear their thoughts on why they bought it, or why they decided not to. For those that were on the fence, usually because they didn't use patches already, things that I heard most often were:
- "I love these but I don't know where I'd use this..."
- "I won't be able to use it somewhere else once I iron it on right?"
- "I don't really use patches... I don't have a denim jacket to put these on."
Years ago, I had these same thoughts when I was buying my first patch — I loved the design but hesitated on buying it because I couldn't figure out where I would iron this on, or worried that I'd ruin something if I tried ironing...
We're going to clear up some myths walk through some tutorials on applying patches today!

Today I'm going to share 4 ways you can use an iron-on patch, and the way that I've been applying patches myself — hopefully these tips and tutorials help you with your own patches, and you see patches in a new light with so much more possibilities!!
👉 Use an iron (tutorial)
👉 Sew or stitch with needle and thread
👉 Add a bar pin to the back
👉 Add velcro to the back
👉 Bonus: Add felt to help keep the patch flat
💨 Use an iron (tutorial)
This is the traditional way of applying an iron-on patch...with a trusty iron! You're using the heat of the iron to melt the adhesive on the back of the patch so that it glues to the surface you're ironing it onto.
1. Make sure the surface you're applying the patch is clean and laid as flat as possible.
2. Depending on the fabric/surface, set your iron to the maximum heat that the fabric can withstand — make sure you set this correctly so you don't burn or scorch the fabric by accident! Allow it to heat up.
(Optional) You can pre-heat the surface you're applying the patch to - this helps make it easier for the patch adhesive to melt and you're also ironing out any wrinkles if there is any.
3. Position the patch on the fabric/surface.
4. Place a thin towel over the patch and surrounding area without shifting the patch position - this helps it from coming in direct contact with the iron.
5. When your iron is ready, press the iron firmly down on the patch for 30-45 seconds (Important: Don't move the iron too much or the patch might shift!)
6. Lift the iron and allow the patch to cool enough to touch. Lightly lift the edges to test if the patch is secure.
7. You'll have to repeat steps 5-6 a few times for the patch to heat up enough for the adhesive to get activated.
8. If the adhesive is not activating after many tries, try increasing the heat of the iron and repeat ironing the patch for 30 seconds at a time.
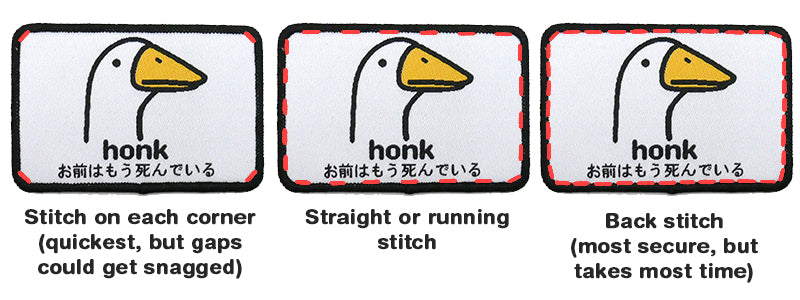
Tip: For extra protection if the patch is somewhere where it could be snagged or bent, you can sew a few stitches on the edges of the patch to secure it!
🧵 Stitch with needle and thread
If you don't want to use an iron for your patch, you can sew it on with some needle and thread! This might take the most time to do, but is the most secure out of all the methods I'm sharing!
1. Use a similar colored thread as where you'll be sewing on the patch if you want the threads to blend in. Use different colors if you want some cool color combos!
2. Sew close to the edges of the patch to keep it flat along the surface.
Here are some a few basic hand stitches I've used when sewing my patches:
This video will cover how to add a pin back or velcro to your patch — you can watch the tutorial or scroll down to read the step-by-step instructions below!
🎀 Add a bar pin back to the patch
You can transform your patches into pins! This way, your patches can go wherever they please, all the time :) What you'll need are bar pin backs, or bar pins — they're pin backs with a flat side to them for gluing onto a surface, and some come with a locking mechanism to keep the pin from coming loose!
I use small tubes of super glue from my local dollar store to stick the bar pins onto my patches - they're easy to work with, just make sure you don't get any on your hands (wash it off asap if you do). Hot glue works just as well as another option!
1. Position where you want the pin to be - make sure the pin "opens" up the right way based on what feels most comfortable for you to use! Lightly mark the area if needed.
2. Slowly dab super glue onto the flat part the bar pin until it's evenly covered —you don't need to put too much, a little goes a long way with super glue!
3. Press the bar pin down and hold for about 5-10 seconds to allow it to set in place. You can dab a bit more super glue around the edges of the flat piece for extra coverage if you'd like.
4. That's it, you're done!
🧣 Add velcro on the back
Use velcro strips to turn it into a velcro patch — usually velcro strips already have an adhesive sticker backing, but if it doesn't then you could use hot glue or sew on the velcro strip.
1. Glue or stick on the rough or "hook" side of the velcro strip to the back of the patch so you cover the entire surface.
2. Trim away the excess velcro strip (be careful not to trim the black merrowed border of the patch - the stitches will come loose!)
3. Voila — you now have a velcro patch!
💡 Bonus: Add felt to help keep the patch flat
Adding a piece of felt to the back of the patch before you put a pin on makes the patch feel sturdier, and keeps it from curling!
The steps are similar to sewing and gluing, but I'd recommend using hot glue to glue the felt and bar pin on — I found that fabric glue and superglue gets absorbed into the felt and leaves weird spots :(
1. Trace the shape of the patch onto your felt piece.
2. Cut the felt piece out — you can use hot glue or iron on the felt to the back of your patch.
3. To add the bar pin onto the felt piece, you can use hot glue to glue the pin down onto the felt, or sew the pin onto the felt before the felt piece gets glued onto the patch.